In this article, we have discussed the ways using which you can backup and restore the file on your Windows 10 PC. It’s crucial to have a backup of files and folders. This will prevent them from unprecedented damage in case they no longer open on your system. In case you don’t have a backup of your files and folders, it may create serious trouble. However, there’s one of the best Windows 10 features that automatically saves files and folders to a dedicated backup drive or device, therefore cutting offload of following a manual backup process. The File History feature allows users to recover the previous version of a specific file or folder in case it goes missing from the system or gets corrupted. It now takes only minimal effort to backup and restores files on Windows 10 system.
On that note, let’s get started with the instructions on how to save your crucial documents, files, and photos if something goes wrong.
Set Up Storage Device
Before you proceed any further,ensure that a viable drive is attached and can be accessed from your system. It can be a network-attached storage drive, external drive,or any flash drive. If there are possibilities to connect a drive to your PC,make sure you do the same before you go for a wireless network drive. Also, ensure that the drive is connected to a power supply and mapped appropriately.
Set Up File History
To set up File History, you need to follow these instructions:
- Tap on the Start button on your Windows 10 PC.
- Further, head over to the Settings.
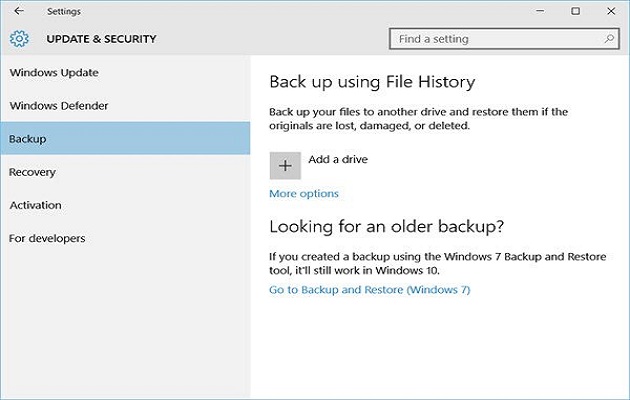
- Then, click on “Update & Security.”
- Next, tap on “Backup,”and click on the “Add a drive” option appearing under “Back up using File History.”
- If you have connected a workable backup device, you will see everylocale among which you canselect your preferredlocation forbackup purposes. Though File History is now turned on, it isn’t backing up files yet.
- You need to tap on “More options” so as to set some parameters.
- Tap on the drop-down menu “Back upmy files,” appearing on the top of the File History window. Now select how frequently you want the backup to happen. You can select a value between 10 minutes to Daily.
- Further, tap on the drop-down menu “Keep my backups,” and choose the duration forwhich you want to retain your backed-up files.
Manage Folders
The File History feature backs up several folders by default, including Music,Downloads, Desktop,and more. Meanwhile, it also lets you deletethe unrequired folders. Scroll below to the Backup options screen and further review the default folders already added for getting backed up. Select the folder that you don’t want to be backed up any further, and then tap on the Remove button so as to exclude it from the list. You can also add several custom folders by tapping on the “Add a folder” button appearing under the heading “Back up these folders.”Now, from File Explorer, you need to select the folders you want to add to your backup list.
Backup Files
After you have set up everything, now it’s time for you to take the backup. Tap on the“Back up now” button appearing at the top of your PC’s display. Once you click on it, Windows will initiate the backup process for these files. Once the backup process finishes up, Windows will show the total storage size and the time and date of the backup.
Restore Files
From now on, whenever a file gets corrupted or accidentally gets deleted, you can make use of the File History backup and restore the required. Now head back to the Settings, tap on “Update & Security,”and then press “Backup” and tap on“More options.” Scroll below to the File History’sbottom window and tap onthe link “Restore files from a current backup.”
Your Windows system willshow the entire list of foldersbacked up by the File History feature till now. You may need to search through a few pages so as to find the required file. Once located, double-tapon that specific folder and further do the same for the file that needs to be viewed. If the file appearing on your screen is the same as the one you had required,tap the green button (with a white arrow)appearing at the bottom window so as to restore the file.
In case the previous original file has not been deletedand is present on its original location, your operating system will ask whether you want it to be replaced,sipped, or keep both files. If your original file goes missing, it will automatically be restored by Windows to its previous location.
That’s it. These were the instructions using which you can back up and restore your files and folders on a Windows 10 PC.
Wilder Zayn is a self-professed security expert; he has been making the people aware of the security threats. His passion is to write about Cyber security,cryptography, malware, social engineering, internet and new media. He writes mcafee.com/activate security products.
Source: https://supportmcafee.weebly.com/blog/how-to-back-up-and-restore-your-files-in-windows-10


No comments:
Post a Comment