Showing posts with label Windows_10. Show all posts

Friday, 2 April 2021

How to Back Up and Restore Your Files in Windows 10

 In this article, we have discussed the ways using which you can backup and restore the file on your Windows 10 PC. It’s crucial to have a backup of files and folders. This will prevent them from unprecedented damage in case they no longer open on your system. In case you don’t have a backup of your files and folders, it may create serious trouble. However, there’s one of the best Windows 10 features that automatically saves files and folders to a dedicated backup drive or device, therefore cutting offload of following a manual backup process. The File History feature allows users to recover the previous version of a specific file or folder in case it goes missing from the system or gets corrupted. It now takes only minimal effort to backup and restores files on Windows 10 system.
On that note, let’s get started with the instructions on how to save your crucial documents, files, and photos if something goes wrong.

Set Up Storage Device
Before you proceed any further,ensure that a viable drive is attached and can be accessed from your system. It can be a network-attached storage drive, external drive,or any flash drive. If there are possibilities to connect a drive to your PC,make sure you do the same before you go for a wireless network drive. Also, ensure that the drive is connected to a power supply and mapped appropriately.

Set Up File History
To set up File History, you need to follow these instructions:

  1. Tap on the Start button on your Windows 10 PC.
  2. Further, head over to the Settings.
  3. Then, click on “Update & Security.”
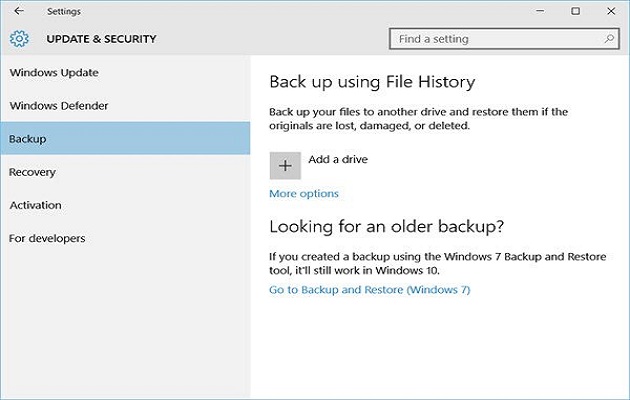
  4. Next, tap on “Backup,”and click on the “Add a drive” option appearing under “Back up using File History.”
  5. If you have connected a workable backup device, you will see everylocale among which you canselect your preferredlocation forbackup purposes. Though File History is now turned on, it isn’t backing up files yet.
  6. You need to tap on “More options” so as to set some parameters.
  7. Tap on the drop-down menu “Back upmy files,” appearing on the top of the File History window. Now select how frequently you want the backup to happen. You can select a value between 10 minutes to Daily.
  8. Further, tap on the drop-down menu “Keep my backups,” and choose the duration forwhich you want to retain your backed-up files.

Manage Folders
The File History feature backs up several folders by default, including Music,Downloads, Desktop,and more. Meanwhile, it also lets you deletethe unrequired folders. Scroll below to the Backup options screen and further review the default folders already added for getting backed up. Select the folder that you don’t want to be backed up any further, and then tap on the Remove button so as to exclude it from the list. You can also add several custom folders by tapping on the “Add a folder” button appearing under the heading “Back up these folders.”Now, from File Explorer, you need to select the folders you want to add to your backup list.

Backup Files
After you have set up everything, now it’s time for you to take the backup. Tap on the“Back up now” button appearing at the top of your PC’s display. Once you click on it, Windows will initiate the backup process for these files. Once the backup process finishes up, Windows will show the total storage size and the time and date of the backup.

Restore Files
From now on, whenever a file gets corrupted or accidentally gets deleted, you can make use of the File History backup and restore the required. Now head back to the Settings, tap on “Update & Security,”and then press “Backup” and tap on“More options.” Scroll below to the File History’sbottom window and tap onthe link “Restore files from a current backup.”
Your Windows system willshow the entire list of foldersbacked up by the File History feature till now. You may need to search through a few pages so as to find the required file. Once located, double-tapon that specific folder and further do the same for the file that needs to be viewed. If the file appearing on your screen is the same as the one you had required,tap the green button (with a white arrow)appearing at the bottom window so as to restore the file.
In case the previous original file has not been deletedand is present on its original location, your operating system will ask whether you want it to be replaced,sipped, or keep both files. If your original file goes missing, it will automatically be restored by Windows to its previous location.

That’s it. These were the instructions using which you can back up and restore your files and folders on a Windows 10 PC.

Wilder Zayn is a self-professed security expert; he has been making the people aware of the security threats. His passion is to write about Cyber security,cryptography, malware, social engineering, internet and new media. He writes mcafee.com/activate security products.

Source: https://supportmcafee.weebly.com/blog/how-to-back-up-and-restore-your-files-in-windows-10

Thursday, 18 March 2021

Hidden Features on Windows 10 that You Should Try

Windows is one of the most popular operating systems and millions of people use it every day for a variety of purposes. But there are some hidden features on Windows 10 about which you might not aware of. In this article, we will share some tips to access these hidden features.

God Mode

God Mode, also known as Shortcut Windows Master Control Panel. Once you enable this feature, it will provide you with advanced customization tools with more than 200 advanced settings. This is a very powerful feature and it can cause a lot of unforeseen harm to your device due to this reason Microsoft hid this tool. However, if you want to access this tool, then you will have to follow a few steps mentioned below:

Create an empty folder on the desktop to use it as a shortcut to access the God Mode, Now rename the folder in the following format – (Folder Name). {ED7BA470-8E54-465E-825C-99712043E01C}. Once you are done with the renaming process, the folder will automatically change into a shortcut format. Now double click on it and you are ready to use the God Mode.

Swipe Down to Shut Down

You can use this feature to turn off your computer quickly. To enable this feature, you will have to create a shortcut folder on the desktop. Click right and choose the Shortcut option. Now you will be redirected to a new window where you can browse and activate the SlideToShutDown option.

Game in Cortana

As we all know that Windows has a voice assistant named Cortona that is not very advance but it works decently. But do you know that it includes some mini-games? Well, these games are not super exciting, but they are good to spend a few minutes. You just need to open Cortona and type or speak Rock Paper Scissors, Flip the Coin, or Roll the Die, and it will redirect to the game window.

Shake to Clean Screen

This feature will help you clean your screen without turning off each window. You just need to hold the top bar space on Windows 10 and shake back and forth multiple times and it will automatically close all your windows automatically beside the window you want to keep using.

3D Apps

Microsoft added a hidden app that has the ability to manipulate 3 models, you can use this tool to have some fun and kill your spare time. To use it, you just need to open the search bar, type Mixed Reality Viewer in it, and press enter.

These are undoubtedly very cool features and I strongly recommend you try them. These tools will give you entirely a new experience of using Windows 10. Well, you might have already heard about or used a few of the features mentioned above, but if you haven’t tried any of them, then it’s the time you should do it. Thank you!

Wilder Zayn  is a self-professed security expert; he has been making the people aware of the security threats. His passion is to write about Cyber security,cryptography, malware, social engineering, internet and new media. He writes norton.com/setup security products.

Source: https://smnorton.com/hidden-features-on-windows-10-that-you-should-try/

Tuesday, 15 December 2020

Full Screen not Working on YouTube? Here are the Fixes

At times, Windows 10 users may face an issue concerning the  Google Chrome Full Screen mode. This issue crops up when trying to play YouTube videos. A majority of the time, rebooting the web browser or device will fix the issue; and if not, here are a few solutions that you can apply.


Check Flash Player and Content Settings in Chrome

  1. Enter “chrome://settings/content” in the address bar of Google.
  2. Then choose the ‘Protected Content’ option.
  3. Don’t forget to mark both options.
  4. In case you have an outdated Chrome version, then input “chrome://plugins” into the box and hit the Enter button.
  5. Find the player entry containing “pepflashplayer.dll” and select the Disable option.
  6. Now, reboot Chrome.

Check Full-Screen API in Firefox

  1. Navigate to the address bar on Chrome.
  2. Then input “about:config” into it and select the OK button.
  3. You should browse for the entry “full-screen” through the address bar, and don’t forget to mark the ‘full-screen-api.enabled’ box.
  4. Once you have applied the changes, reboot the browser.

Use Incognito Mode and Try Removing Browser Data

  1. Firstly, hold the ‘Ctrl + N’ hotkeys simultaneously over the keyboard.
  2. Then reach YouTube and attempt opening any video in the full-screen. In case it shows the display properly, proceed with the further fixes.
  3. Now, in the tab, input “chrome://settings” and hit the Enter button.
  4. You should move to the end of the screen and choose the ‘Advanced settings’ option.
  5. After expanding the menu of Advanced, beneath the “Privacy and Security” section, select the “Clear browsing data” option.
  6. Then click on the ‘All-time’ and mark every box.
  7. Now, select the “Clear browsing data” option.
  8. Finally, reboot the system and attempt to open a YouTube video once again in full-screen.

Log Out of Google Profile

  1. At first, select the profile image over the upper right of the screen.
  2. After that, click on the ‘Syncing to’ button.
  3. Then select the ‘Turn off’ option for the user profile.
  4. After disabling the profile, select the ‘Manage other people’ option.
  5. You should choose the vertical ellipsis menu icon and choose the ‘Remove this person’ option.
  6. Now, reboot the system and attempt accessing YouTube in full-screen mode.

Reinstall the Google Chrome

  1. Press the Windows and R hotkeys altogether for launching the Run prompt.
  2. Then browse for Chrome and right-click on it.
  3. From the context menu, choose the Uninstall button.
  4. Finally, navigate to the official download site of Google and download the latest version of Chrome.
  5. Now, open the executable file and then install the browser once again.

Emily Johnson is a Microsoft product expert and has been working in the technology industry since 2002. As a technical expert, Emily has written technical blogs, manuals, white papers, and reviews for many websites such as office.com/setup.

Source: Full Screen not Working on YouTube

How to Use Time to Walk Feature in Apple Fitness Plus?

Apple use to add several new services and apps to its health and fitness device that is Apple Watch. The company has recently introduced an ...